Bow shackles have a round, O-shaped bow that handles loads from many directions. D shackles use a narrow D-shape made for straight pulls. Picking the right one matters for safety, load capacity, and rigging efficiency. Choosing the wrong type can create dangerous lifting conditions.
This guide looks at the bow shackle vs d shackle comparison in design, load direction, uses, and capacity. You will learn how shape affects how force spreads. The dee shackle works best for in-line lifting. The anchor shackle handles angled pulls from many directions. D shackles are great for simple vertical or horizontal rigging. The d-shackle design gives strength in direct tension. Knowing bow and dee shackles helps you match hardware to your job. Dee shackles fit chain connections and straight pulls.
Key Takeaways
Bow shackles have a round shape for angled loads. D shackles have a narrow shape for straight pulls.
Choose a bow shackle for multi-directional lifts. Choose a D shackle for in-line lifting.
Check the working load limit (WLL) and safety factor. The WLL must exceed your load.
Inspect shackles before each use. Look for wear, cracks, or bent pins.
Buy shackles with clear markings and certification. This ensures safety and quality.
What Is a Bow Shackle?
Rounded O-Shape and Wide Bow
A bow shackle has a wide, rounded body that looks like the letter O. This bow shackle design makes a big space inside. The round shape lets you hook up many slings, ropes, or chains to one spot without them getting crowded. The wide opening also fits over bigger load attachment lugs.
The curved shape spreads force out evenly along the metal. Pulls from different angles balance across the bow instead of building up in one place. This makes the bow shackle a good choice for loads that pull from more than one direction. Forged steel and alloy steel are common materials. Alloy steel gives you a higher working load limit than carbon steel at the same size, so you can use smaller, lighter hardware for heavy loads.
Also Known as an Anchor Shackle
People often call this hardware an anchor shackle. The name comes from the wide, rounded bow that holds multiple sling legs and allows some angled loading. You will see the term anchor shackle used in marine towing, heavy equipment rigging, and anchoring jobs. The anchor shackle also works well in multi-leg sling assemblies and angle structures in power transmission networks.
Every bow shackle has permanent markings on its body. You should find the working load limit (WLL), the maker's ID or logo, a batch or serial number, and a certification mark such as CE. ASME B30.26 covers design factors, proof loading, and maker identification. OSHA 29 CFR 1926.251(f) requires clear markings that show the rated capacity. The WLL applies only to a straight, inline pull. It is not the breaking strength. For a quick chain shackle vs anchor shackle comparison, just remember that the anchor shackle handles angled pulls while the chain shackle handles straight ones. This bow shackles: an overview shows why the rounded shape lowers stress on your slings and keeps your rigging efficient.
What Is a Dee Shackle?
Narrow D-Shape and Straight-Line Design
A dee shackle is a D-shaped metal link with a removable pin. Its narrow body makes it look like the letter D. This d shackle design gives you strength when you pull along the shackle's axis. The shape keeps the load centered and in line.
You use dee shackles for single-leg hitches and in-line lifting. They work well for straight pulls and static securing jobs. The narrow body does not handle side loads well. Multi-leg sling arrangements can put side force on the shackle. That force can bend or break the pin. Stick to straight-line work with this hardware.
The d-shackle body comes in forged steel and alloy steel. No single size fits every 1-ton D shackle. Pin diameter and body thickness change between makers. Always check the manufacturer's specifications for the working load limit and certification documents.
Also Known as a Chain Shackle
People call this hardware a chain shackle because of its D-shaped bow. The bow is narrower than an anchor shackle. That difference matters in a chain shackle vs anchor shackle comparison. The chain shackle fits chain links and straight connections. The anchor shackle handles wider, angled loads.
The key characteristics of chain shackles include two common pin styles. Each style suits a different job.
Screw pin shackles: A threaded pin screws into the body. They connect and disconnect fast. Use them for temporary jobs like tie-downs and towing. The pin can unscrew under vibration, so check it before each lift.
Bolt-type shackles: A bolt, nut, and cotter pin hold the pin in place. They stay secure under rotation and torque. Use them for long-term installations or multi-leg slings.
Screw pins work best for pick-and-place tasks. Bolt pins work best when the shackle stays put. Match the pin style to your job, and you get safe, reliable lifting.
Key Differences Between Bow Shackles and Dee Shackles
The difference between bow shackles and dee shackles comes down to body shape, pin style, and how each design handles force. You need to know these key differences before you pick hardware for any lifting job. The shape and design differences between these two options affect everything from safety margins to rigging flexibility.
Shape, Width, and Pin Type
A bow shackle has a rounded, omega-shaped body with a wide bow. This makes a bigger space inside that lets you fit multiple sling legs or wide straps easily. The anchor shackle also allows more side-to-side movement because of its large throat opening. A dee shackle has a narrow, D-shaped body with a compact profile. This slim design limits sideways movement and works well for single connection points.
The table below sums up the main size and mechanical differences:
Feature
Bow Shackle (Anchor Shackle)
Dee Shackle (Chain Shackle)
Shape
Wide rounded bow with larger internal space
Narrow D-shaped body with compact design
Load Direction
Handles multi-directional or angled loads
Best for straight-line or inline loads
Strength
Slightly lower WLL for same size due to wider bow
Often stronger for straight-line pulls
Connection Capacity
Accommodates multiple sling legs or wider straps
Typically used for single connection points
Versatility
More flexible for complex rigging setups
Limited to aligned load applications
Space Requirement
Requires more space due to wider shape
Ideal for tight spaces or compact assemblies
Pin type also sets these two shackle styles apart. Screw pin shackles use a threaded pin that screws into one tapped ear. They go together fast but can come loose under vibration or repeated tension. Use them only for temporary, watched connections. Bolt-type shackles use a smooth bolt through both ears, held by a nut and a cotter pin. This locking method keeps the pin from backing out under changing loads. Bolt-type pins are the standard for long-term, heavy offshore, or constant-rotation lifts.
How Shape Affects Load Distribution
The main size difference between a bow shackle and a dee shackle is in the body shape, which directly decides how it acts under force. A bow shackle spreads loads across several contact points along its curved bow. This makes it good for multi-directional and angled loading. A dee shackle makes a more direct load path between pin and crown. It works well under straight-line tension but has little tolerance for side loading.
Side-loading a dee shackle can greatly lower its effective Working Load Limit (WLL). Depending on the loading angle, you risk deformation or pin binding. The d-shackle design focuses force along one axis, so any off-axis pull creates bending stress. The chain shackle vs anchor shackle comparison shows this clearly: the chain shackle excels in controlled, axial loading, while the anchor shackle handles variable directions.
The chain shackle vs anchor shackle key differences also include safety factors. General lifting and rigging applications use a 4:1 safety factor under standards like EN 13889 and ASME B30.26. Personnel lifting, offshore operations, and dynamic shock loading require a 6:1 safety factor. These standards govern forged steel shackles, covering dimensions, mechanical properties, marking, and testing.
When you compare bow shackles vs. dee shackles, remember that the bow shackle trades a small amount of straight-line strength for versatility. The dee shackle gives you maximum strength in direct tension but punishes side loads. For the bow shackle vs d shackle decision, ask yourself one question: will the load pull from multiple angles or stay in a straight line? Your answer points you to the right hardware. Both bow and dee shackles serve critical roles, but you must match the shape to the load path for safe, efficient rigging.
Difference Between a Bow Shackle and a Dee Shackle in Load Direction
The direction of the load tells you which shackle to choose for your rigging job. The difference between a bow shackle and a dee shackle is easiest to see when you look at how each one handles force from different angles. You must match the hardware to the pull direction before you lift anything.
Multi-Directional Loading in Bow Shackles
A bow shackle can take loads from many directions without losing its hold. The wide, rounded body makes a large space inside. This space lets sling legs spread out on their own. You can attach two or more sling legs to one anchor point without crowding the hardware. The curved bow spreads force across several contact points, so angled pulls do not put stress in one spot.
Makers rate bow shackles for multi-leg bridles and sling angles that shift. When you use a two-leg wire rope bridle, the sling legs spread apart as they reach toward the load. The bow shackle allows this spreading motion. The load stays lined up with the pin even when the angle changes during the lift.
You still must check the sling angle and the load on the pin. The bow shackle handles angled pulls, but it has limits. Based on maker side-loading guidance, a bow shackle loaded at a 45° angle should carry only about 70% of its in-line rating. At a 90° angle, that allowed load drops to about 50%. These percentages differ by maker, and ASME B30.26 requires you to figure out forces but does not set one percentage itself.
The bow shackle vs d shackle comparison shows that the rounded design trades a little straight-line strength for this flexibility. You gain the ability to handle loads from many directions. You lose some capacity when you push the hardware to extreme angles. Always lower the rated load when you know the pull will come from an angle.
Straight-Line Loading in Dee Shackles
A dee shackle needs straight-line tension across the centerline of the pin. The narrow D-shaped body keeps the load path direct and simple. You use this hardware for single-leg hitches, vertical lifts, and controlled pulls where nothing turns or shifts. The d-shackle design gives you the most strength when the load pulls right along the shackle's axis.
Dee shackles are not good for side loading. The narrow body cannot take force that pushes sideways against the pin. When you use a multi-leg sling with a dee shackle, the sling eyes crowd together. The legs spread outward and push the hardware out of line. This causes dangerous side-loading on the pin. The pin can bend or break under this stress.
You should also avoid twisting or torsional force on the bow. Uneven load sharing across the shackle body lowers its capacity a lot. The difference between bow shackles and dee shackles comes down to this: the dee shackle works best in controlled, axial loading, while the bow shackle handles changing directions.
Factor
Bow Shackle
Dee Shackle
Recommended load direction
Multi-leg bridles and shifting sling angles
Straight-line loading only
Suitability for multi-leg slings
Preferred — accommodates two or more sling legs
Not recommended — sling eyes crowd and force misalignment
Risk in multi-leg use
Low, when sling angle and pin loading are checked
High risk of side loading as legs spread
Typical applications
Two-leg wire rope bridles, master link connections
Single sling leg to a lifting lug, controlled lifts
The difference between bow shackles and dee shackles in load direction guides your choice. Pick a bow shackle when the pull may shift or come from many angles. Pick a dee shackle when you have a straight, in-line pull. Both bow and dee shackles serve key roles, but you must match the shape to the load path for safe rigging.
Load Capacity Compared
Working Load Limit and Safety Factor
The working load limit (WLL) shows the most force a shackle can take during normal use. Makers find this number by dividing the minimum breaking strength by a safety factor. For lifting shackles, that factor is often 4:1, 5:1, or 6:1. A shackle with a 2-ton WLL and a 5:1 safety factor has a minimum breaking strength of 10 tons. That extra reserve soaks up dynamic forces, shock loads, and wear. It never means you can go past the stated WLL.
Crosby carbon steel shackles use a 6:1 design factor. Their alloy steel shackles use a 5:1 design factor. These ratios mean the hardware can hold six or five times its rated load before it breaks. You should never test that limit on purpose. The margin is there for surprise stresses, not for everyday overloading.
The design factor is the exact ratio between a shackle's ultimate breaking strength and its Working Load Limit. Crosby carbon steel shackles have a 6:1 design factor, while their alloy shackles have a 5:1 design factor. This built-in reserve handles dynamic forces and wear; it is never permission to go past the stated WLL.
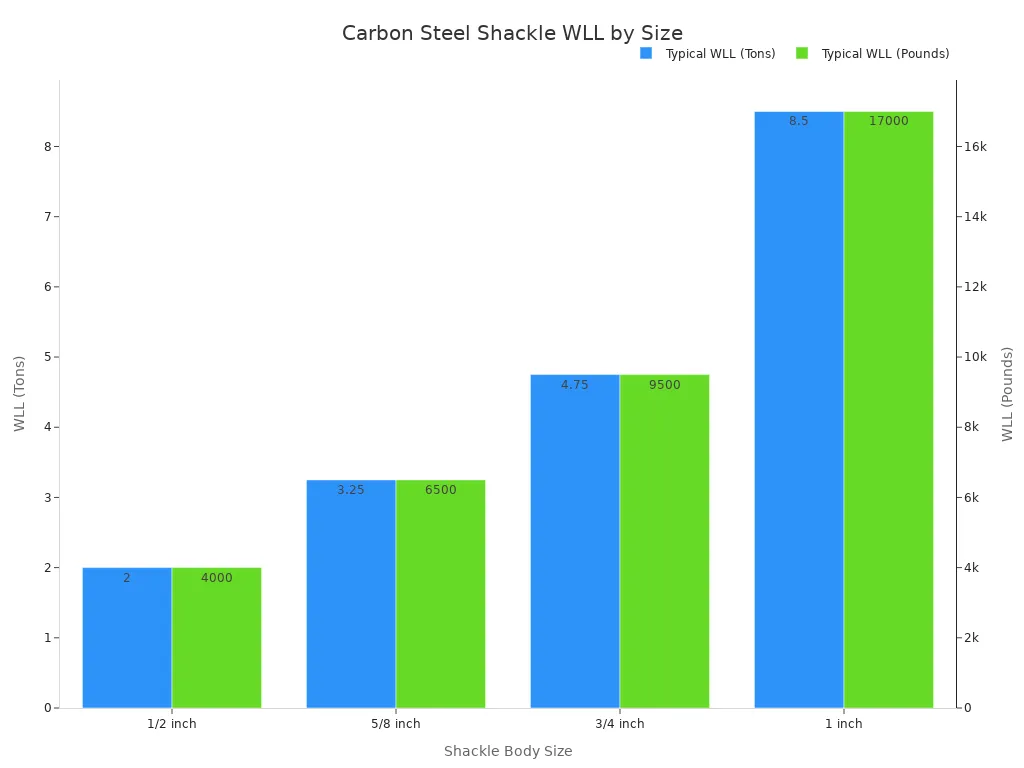
Shackle size directly changes capacity. Here are common WLL values for carbon steel shackles:
Shackle Body Size (Carbon Steel)
Typical WLL (Tons)
Typical WLL (Pounds)
1/2 inch
2 tons
4,000 lbs
5/8 inch
3.25 tons
6,500 lbs
3/4 inch
4.75 tons
9,500 lbs
1 inch
8.5 tons
17,000 lbs
Alloy steel changes the picture completely:
Alloy shackles give much higher WLLs than carbon shackles of the same physical size.
This lets riggers use lighter, smaller hardware to lift heavier loads.
This helps a lot when working with tight clearance lugs.
Does Shape Change Breaking Strength?
Yes, shape matters, but not the way you might think. A dee shackle's narrow body makes a direct load path between pin and crown. That straight line gives it a small edge in pure tension. A bow shackle's wider curve spreads force over more surface area. That design trades a little straight-line strength for multi-directional flexibility.
The real difference shows up in side loading. A dee shackle handles side loads poorly. Off-axis force bends the pin and stresses the narrow body. A bow shackle takes angled pulls because its curved shape spreads force evenly. For straight pulls, both types perform about the same at their rated capacity. The breaking strength depends more on material quality and manufacturing standards than on the shape alone. Choose based on load direction, not just on which one seems stronger.
Common Applications for Each Shackle
When Bow Shackles Are the Better Choice
You reach for a bow shackle when a lift involves more than one sling leg or a load that may shift. Multi-leg sling assemblies are the classic case. The wide bow seats two or three sling legs without crowding them together. This setup lets each leg pull at its own angle while the anchor shackle keeps the load centered on the pin.
Anchor shackles have a rounded bow opposite the pin, making them suitable for side loading and multiple connections, and ideal for larger straps.
Complex rigging systems with multiple ropes, slings, or chains also call for this hardware. The table below shows why.
Application / Feature
Why Bow Shackle Is Required Instead of Dee Shackle
Complex lifts with multiple sling legs
Bow shackles handle loads from different angles and reduce dangerous side-loading that standard shackles may suffer.
Multi-leg slings and multi-leg bridles
The larger bow shape accommodates angled pulling forces from two-leg or three-leg sling bridles better than a D-shackle.
Side loading situations
Bow shackles are suitable for side loading, while dee shackles are more limited in multi-directional loading.
Wider lifting points or multiple sling eyes
The wider opening can connect to wider lifting points, larger straps, or multiple sling eyes.
Towing and off-road recovery also favor this type. A recovery strap can pull from shifting angles as vehicles move. The rounded bow absorbs those changes without binding the pin.
When Dee Shackles Are the Better Choice
A dee shackle shines in straight-line pulls and in-line lifting. You use it for simple vertical or horizontal rigging where the load stays on the shackle's axis. Chain-to-chain connections and wire rope eye connections are common jobs for this hardware.
Towing setups with a fixed pull direction work well with a dee shackle. Anchoring applications also suit this design when the load path stays straight. Off-road recovery with a single, steady pull angle is another good fit. The narrow body fits tight spaces that a wider bow cannot enter.
The shackle choice comes down to load path. Pick a dee shackle for controlled, axial pulls. Pick a bow shackle when loads from multiple directions or angled slings are possible. Both bow and dee shackles serve lifting and rigging well when you match the shape to the job.
Bow Shackle vs D Shackle: Comparison Table
Shape and Load Direction
The table below shows the bow shackle vs d shackle comparison side by side. You can quickly see how body shape and load direction are different.
Straight-line, in-line loads; side-loading not recommended
Pin Type
Screw pin (temporary) or bolt-type (permanent)
Screw pin (temporary) or bolt-type (permanent)
The shape difference between a bow shackle and a dee shackle changes everything else. A bow shackle has a wide, rounded O shape. This design works with multi-directional loads and many sling connections. You see it in marine, offshore, construction, and heavy lifting work. A d-shackle has a narrow, straight-sided D shape. It works best for straight-line lifting and pulling. Warehousing, logistics, and industrial lifting depend on this design.
Capacity and Applications
Capacity does not come from shape alone. A 1-inch screw pin anchor shackle and a 1-inch screw pin chain shackle both carry an 8½-ton WLL. The working load limit is the modern term under ASME standards. The older term SWL means the same thing. Both show the most load allowed.
You must watch side loading on any hardware. Force across the pin creates higher stress than angular loading through the bow. Some makers do not allow side loading at all. European and US shackles may show different capacities at the same size. Design factors differ (EN 13889 uses 6:1, ASME uses 5:1), and units differ (metric ton vs short ton). When you compare bow and dee shackles, check the certification mark and the maker's data. Pick dee shackles for straight pulls. Pick a bow shackle when the load may shift or pull from an angle. This simple rule keeps your rigging safe.
Real-World Rigging Examples
Multi-Leg Sling Assemblies
Multi-leg sling assemblies show the bow shackle at its best. A two-leg sling fits a load with two lift points that is symmetric and stable. A three-leg sling suits a round or triangular base structure, where three-point contact gives better stability than two legs without the complexity of four. A four-leg sling works when you have four engineered lift points, when orientation control matters more than raw capacity, or when you want redundancy on a critical lift.
Most rigging standards apply a 3-leg capacity factor to four-leg assemblies. Loads rarely balance perfectly, so the assembly is rated as if only three legs share the load reliably. This is why a four-leg sling is not rated at four-leg capacity.
All multiple-leg slings use a collector ring, or oblong master link, at the top. The lower end fittings vary. A double-leg sling with sling hooks is a DOS; with grab hooks it is a DOG. Triple-leg and quadruple-leg versions follow the same naming pattern. The bow shackle connects the master link to each sling leg and lets the legs spread at their own angles.
Towing, Anchoring, and Off-Road Use
Towing, anchoring, and off-road recovery put changing pull angles on your hardware. According to the Ordealist Recovery Shackle Guide, bow shackles are the recommended type for these jobs. The rounded bow disperses force during recovery, when the angle of pull on the shackle may change as a vehicle is pulled free. A dee shackle cannot match that tolerance for shifting direction.
You will also see bow shackles in marine towing and anchoring, where the load path shifts with wind, current, and vessel movement. In lifting and rigging work, this flexibility keeps the pin aligned and lowers the risk of side loading. Match the shackle to the job, inspect it before each use, and follow the maker's guidelines. That habit keeps your rigging shackles safe for every lift.
How to Choose the Right Shackle
Step 1: Identify Load Direction and Sling Angle
Begin with one question: will the load pull straight, or will it pull from changing angles? A dee shackle works for in-line pulls. A bow shackle works for loads that pull from many directions. Check your sling angle as well. A wider angle puts more force on each leg and on the shackle pin.
Picture the whole lift path in your mind. Does the load shift, swing, or turn? Do two or more sling legs meet at the same point? If so, choose a bow shackle. If the pull stays on one axis, a dee shackle gives you a direct load path. This one choice guides your shackle pick more than anything else.
Step 2: Check WLL, Size, and Certification
Never choose a shackle by physical size alone. A small high-grade shackle may safely hold more than a larger low-grade one. The working load limit must be higher than your real load, and you must think about sling angles, shock loading, and side-loading reductions. The industry-standard safety factor for heavy-duty shackles is usually 5:1, so a 5-ton rated shackle must hold up to 25 tons before it fails in controlled tests.
Trusted suppliers sell shackles that meet ASME B30.26, OSHA, and EN standards. Check certification and testing papers before you buy. Look for these markings:
Working Load Limit (for example, WLL 25 T)
Manufacturer identity
Traceability code linking the shackle to its batch records
Steel grade (4, 6, or 8)
Conformity code such as CE
All markings must stay easy to read. Replace any shackle with unreadable WLL markings or missing identification. Ask for mill test certificates and product traceability documents. Make sure the certificate belongs to the exact product, not a similar model. Be careful with a supplier who has missing details or no verifiable issuing organization. Proper sizing and paperwork protect every lift.
Before each use, check for wear, cracks, or deformation. Follow the manufacturer's guidelines. These habits support safe rigging on every job.
Pick the shackle that fits the load path. Use a bow shackle when slings pull from changing angles or many directions. Use a dee shackle when the pull stays straight and in line. Shape helps you choose, but size, working load limit, and certification keep the lift safe. A small high-grade shackle can beat a larger low-grade one. Always check that the WLL is more than your real load. Inspect every shackle before each use. Look for wear, cracks, or bent pins. Replace any hardware with markings you cannot read. Follow the maker's guidelines with no exceptions. These habits protect your crew and your gear on every job.
FAQ
Can you use a bow shackle and a D shackle interchangeably?
No. Each type fits a specific load path. A bow shackle handles angled or multi-directional pulls. A D shackle works only for straight-line tension. Swapping them can cause side loading, pin bending, or hardware failure. Match the shackle shape to your actual load direction every time.
How do you tell a bow shackle from a D shackle?
Look at the body shape. A bow shackle has a wide, rounded O-shaped bow. A D shackle has a narrow, straight-sided D-shaped body. The bow shackle also has a larger internal opening. Check the permanent markings for the WLL and manufacturer ID on both types.
What happens if you side-load a D shackle?
Side loading pushes force across the pin instead of along it. The narrow D-shaped body cannot handle this stress well. The pin can bend, bind, or break. Capacity drops sharply at off-axis angles. Always keep the load centered on the shackle's axis when you use a D shackle.
Can you use a D shackle for towing or off-road recovery?
No. Towing and recovery involve changing pull angles as vehicles move. A D shackle cannot tolerate shifting direction. Use a bow shackle instead. Its rounded bow disperses force during recovery and keeps the pin aligned. This reduces the risk of side loading and hardware failure.
How often should you inspect a shackle?
Inspect before every use. Look for wear, cracks, deformation, or bent pins. Check that markings stay readable. Replace any shackle with damaged threads or missing identification. Follow the manufacturer's guidelines for inspection intervals and retirement criteria. Regular checks protect your crew and your gear.

 English
 العربية
 Français
 Русский
 Español
 Português
 Deutsch
 italiano
 日本語
日本語 한국어
한국어 Nederlands
 Tiếng Việt
 ไทย
ไทย Polski
 Türkçe
 አማርኛ
አማርኛ ພາສາລາວ
 ភាសាខ្មែរ
 Bahasa Melayu
 ဗမာစာ
ဗမာစာ தமிழ்
தமிழ் Filipino
 Bahasa Indonesia
 magyar
 Română
 Čeština
 Монгол
 қазақ
қазақ Српски
 हिन्दी
 فارسی
فارسی Kiswahili
 Slovenčina
 Slovenščina
 Norsk
Norsk Svenska
 українська
 Ελληνικά
 Suomi
Suomi Հայերեն
 עברית
עברית Latine
 Dansk
Dansk اردو
اردو Shqip
Shqip বাংলা
বাংলা Hrvatski
 Afrikaans
 Gaeilge
 नेपाली
 Oluganda