Every secure structure relies on robust connections. Tension hardware plays a critical role in structural stability, lifting operations, and load-bearing applications. When these components fail, the consequences are severe. Improper installations risk catastrophic collapses. They accelerate premature equipment wear. They also lead directly to non-compliance with rigorous safety regulations. We must treat these assemblies seriously. Our objective is clear. We aim to provide a definitive, evidence-based roadmap for your projects. You will learn how to select, install, adjust, and lock off these devices properly. Following these guidelines ensures safe and lasting results. You can trust this approach to protect both personnel and property.
Key Takeaways
- Capacity alignment is non-negotiable: Tension hardware must be sized to match or exceed the Safe Working Load Limit (WLL) of the connected wire rope or cable.
- Preparation prevents failure: Turnbuckles must be fully extended prior to installation to ensure maximum take-up capacity during the tensioning phase.
- Rotational force management: Proper adjustment requires turning the turnbuckle body without twisting the attached cable, preventing structural fatigue.
- Required lock-offs: For permanent or vibratory applications, securing the turnbuckle using lock nuts or safety wire (mousing) is a mandatory compliance step.
Framing the Core Objective: The Mechanics of Safe Cable Tensioning
Dynamic loads and environmental stress constantly challenge structural integrity. High winds push forcefully against antenna masts. Heavy loads stretch lifting cables under strain. Natural cable stretch occurs over time due to normal usage. Constructional stretch happens initially as wire strands settle. Elastic stretch follows as loads apply tension. These factors create the absolute need for adjustable tensioning systems. You cannot rely on static lengths to maintain stability over months and years.
A successful installation achieves precise tension levels. It never exceeds the Safe Working Load Limit (WLL) of the weakest component. Proper execution avoids thread binding. The industry refers to this binding as galling. Galling destroys threads and renders the hardware useless. The entire assembly must remain perfectly secure under continuous operational vibration. Vibration acts as an invisible force trying to loosen threads daily.
These principles apply across many diverse fields. We see them operating in complex industrial systems. They appear regularly in routine infrastructure maintenance. Maintenance teams use them to fix drooping structural lines. Property owners rely on them to square sagging heavy-duty gates. Every scenario demands exact cable tensioning. Mastering these mechanics prevents costly structural repairs down the road.
Pre-Installation: Selecting the Right Tension Hardware
Evaluating Turnbuckle End Fittings
Engineers must evaluate end fittings carefully before purchasing. Different operational jobs require different connection types. Choosing incorrectly compromises the connection point entirely.
- Hook & Hook: These work best for temporary applications. They allow very quick connect and disconnect actions. You should not use them if tension might suddenly release. A sudden tension drop causes the hook to slip out of its anchor point easily.
- Eye & Eye: Teams use these alongside shackles or heavy-duty quick links. They remain ideal for secure, straight-line pull applications. The closed loop eliminates the risk of accidental slipping.
- Jaw & Jaw (Clevis): This represents the most secure option available. You attach them directly to wire rope eyes or thimbles. They secure easily to fixed anchor points or solid metal plates. You do not need additional connecting hardware.
Table 1: End Fitting Application Matrix
| Fitting Type | Optimal Application | Security Level |
| Hook | Temporary rigging, fast adjustments | Low (susceptible to slack release) |
| Eye | Permanent straight-line tension | High (requires shackle) |
| Jaw (Clevis) | Direct attachment to plates or eyes | Maximum (pin locked in place) |
Sizing and Material Evaluation
Take-up length requirements dictate your specific hardware choice. You must calculate the required thread length accurately. Estimate the expected cable stretch over the lifespan of the rig. Add a generous safety margin for future adjustments. If you underestimate take-up, you will bottom out the threads too soon.
Material selection heavily influences longevity and safety. Galvanized steel offers a highly cost-effective solution. It provides excellent strength for indoor operations or dry environments. The zinc coating resists basic rust. Conversely, 316 Stainless Steel delivers superior, long-lasting corrosion resistance. We strongly recommend it for harsh marine settings or chemically active industrial environments. Selecting the correct tension hardware prevents early replacement cycles and structural decay.
Step-by-Step Turnbuckle Installation Process
1. Component Preparation and Thread Lubrication
Unscrew both end fittings completely before beginning the physical setup. You want to fully extend the main body first. This critical step maximizes the available take-up distance. It guarantees you have enough room to tighten the line properly later. Failing to extend the ends results in a failed adjustment phase.
Next, apply a quality anti-seize compound directly onto the threads. A robust thread lubricant prevents galling under load. Metal threads often fuse together under heavy pressure and friction. This lubrication step proves especially critical for stainless steel components. Stainless steel is notoriously prone to thread binding without lubrication.
2. Anchoring and Rigging the Wire Rope Tensioner
Secure the fixed end of your hardware to the primary structural anchor point. Double-check the anchor's physical stability. Insert the clevis pin correctly and secure it using a cotter pin if applicable.
Attach the wire rope or cable to the opposite end fitting. Ensure you pull the cable as taut as possible manually. Do this by hand or using a come-along tool before making the final hardware connection. A reliable wire rope tensioner only performs optimally if you minimize initial slack. Leaving too much slack wastes valuable take-up distance.
3. Initial Thread Engagement
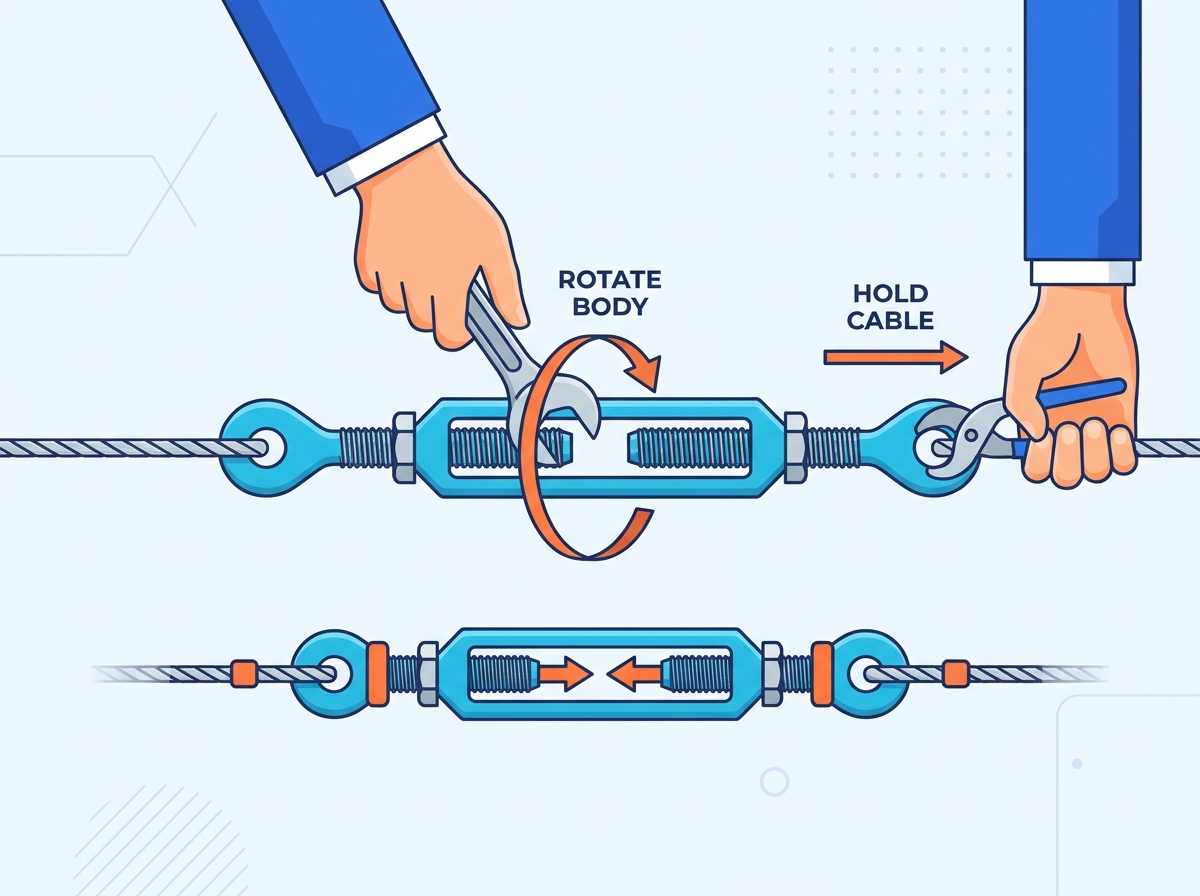
Begin rotating the central body slowly to draw the end fittings inward. Proceed cautiously at first. You must avoid crossing the threads.
Verify both the left-hand and right-hand threads engage evenly. They must pull into the central body at the exact same rate. This balanced practice maintains perfect structural symmetry. Proper turnbuckle installation relies entirely on this equal thread distribution. Unequal threads concentrate stress on one side of the hardware.
How to Adjust a Turnbuckle for Optimal Tension
Executing the Adjustment Safely
Use the correct tools for the specific job. Apply an open-ended wrench on the hex body flats. Alternatively, use a specialized wrench designed specifically for this hardware type. Avoid using long screwdrivers inserted directly through the central body opening. Screwdrivers will permanently deform the metal frame. This weakens the entire assembly and violates safety standards.
Preventing cable twist requires extra attention during this phase. Hold the end fittings completely stationary. You can also grip the wire rope firmly using a separate wrench or cable grips. This dual-tool approach ensures rotational force applies only to the main body. You must not twist the cable itself. Twisting weakens individual wire strands and induces hidden fatigue. To properly adjust turnbuckle tension, completely isolate the turning motion to the center component.
Measuring and Verifying Tension
Measuring tension accurately prevents catastrophic overloading. For precise industrial applications, use a calibrated digital tension meter. This guarantees exact, verifiable load numbers. Engineers require these exact numbers for safety logs. For lighter structural uses, simple deflection tests often suffice. Push firmly against the cable midpoint to check resistance levels manually.
Stop your adjustment immediately before the threads bottom out completely inside the body. Leave a small safety gap. If you reach maximum take-up while cables remain loose, stop turning. The attached wire rope is simply too long. You must unhook the assembly, shorten the wire rope manually, and restart the process.
Turnbuckle Safety, Lock-Offs, and Compliance Risks
Securing the Hardware Against Vibration
Vibration loosening causes many unexpected and sudden structural failures. You must secure the assembly mechanically once you reach the target tension.
Jam Nuts (Lock Nuts): Tighten jam nuts firmly against the main body ends. They wedge tightly against the frame to prevent the body from spinning. They offer a simple, highly effective mechanical lock for static loads.
Mousing (Safety Wire): Heavy industry standards strongly recommend mousing. Thread strong safety wire through the main body opening and wrap it through the end fittings. Tie the wire off tightly using pliers. This physical barrier completely locks the assembly in place. It guarantees absolute turnbuckle safety in highly dynamic, high-vibration environments.
Inspection and Maintenance Protocols
Establish a rigorous routine inspection checklist. Regular, scheduled checks catch dangerous problems early.
- Look for noticeably bent or distorted end fittings.
- Examine the central body closely for hairline cracks or pitting.
- Check the internal and external threads for stripping, flattening, or deformation.
- Inspect the entire unit for localized rust spots or obvious signs of metal fatigue.
Compliance awareness remains paramount across all operations. Remove any deformed rigging turnbuckle from active service immediately. ASME B30.26 standards dictate this strict rule. You cannot bend hardware back into its original shape. You cannot weld the frame to repair visible cracks. Doing so destroys the original heat treatment. Always replace damaged items completely with certified new hardware.
Procurement and Next Steps for Your Project
Selecting the right components makes a huge difference in long-term safety. Shortlisting reliable suppliers requires upfront diligence. Look specifically for vendors offering clearly load-rated hardware. They should willingly provide full material certifications upon request. Lot traceability ensures strict manufacturing accountability.
Run through a comprehensive final checklist before placing your order. Verify the exact wire rope diameter you plan to use. Confirm the required WLL for your specific maximum load. Assess ambient environmental conditions like moisture levels or chemical exposure. Calculate the necessary take-up length precisely.
Take a proactive, actionable next step today. We strongly encourage consulting a certified rigging specialist. Request a detailed technical quote for your specific operational setup. A professional engineering review ensures your selected hardware perfectly matches the rigorous engineering requirements of your project.
Conclusion
Proper installation combines several vital, non-negotiable factors. Accurate sizing sets the initial foundation for success. Careful thread management prevents devastating physical damage during adjustment. Rigorous safety lock-offs secure the final assembly against relentless vibration.
Cutting corners anywhere compromises the entire structural system. Substandard hardware puts nearby people and expensive property at severe risk. Skipping mandatory lock-off procedures merely invites eventual, unpredictable failure. Always prioritize technical precision and strict regulatory compliance.
Review your specific hardware specifications thoroughly before beginning any physical work. Contact a qualified sales engineer for dedicated project support. They can guide your specific load-bearing applications safely and efficiently.
FAQ
Q: How much thread should be engaged inside a turnbuckle?
A: Threads must be fully engaged past the body's internal viewing area. You should see the ends of the threads protruding into the open center frame. Never operate the hardware with threads barely catching the edges. This minimal engagement severely reduces the load capacity and invites thread stripping.
Q: Can I use a turnbuckle for lifting?
A: You can only use it for lifting if the specific hardware is load-rated and certified for overhead lifting by the manufacturer. Many standard commercial units handle static tension only. Always check for proper WLL markings and relevant safety certifications before incorporating them into a lifting hoist.
Q: How do I stop my turnbuckle from loosening over time?
A: You must physically lock the threads. Tighten jam nuts securely against the central body to create friction. For high-vibration environments, use the mousing technique. Thread safety wire through the central frame and wrap it securely around the end fittings to physically restrict any rotational movement.
Q: What is the difference between a turnbuckle and a rigging screw?
A: The primary difference lies in the body design. A standard turnbuckle features an open, easily visible central body. This allows easy inspection of thread engagement. A rigging screw utilizes an enclosed, pipe-like body. The enclosed design protects internal threads from dirt but makes visual thread inspections more difficult.
Q: How do you fix a sagging gate with a turnbuckle?
A: Install a cable diagonally across the gate frame. Attach the upper end to the top hinge corner. Attach the lower end to the bottom latch corner. Tighten the central body slowly. This action pulls the lower corner upward, squaring the frame and eliminating the sag efficiently.

 English
 العربية
 Français
 Русский
 Español
 Português
 Deutsch
 italiano
 日本語
 한국어
 Nederlands
 Tiếng Việt
 ไทย
 Polski
 Türkçe
 አማርኛ
 ພາສາລາວ
 ភាសាខ្មែរ
 Bahasa Melayu
 ဗမာစာ
 தமிழ்
 Filipino
 Bahasa Indonesia
 magyar
 Română
 Čeština
 Монгол
 қазақ
 Српски
 हिन्दी
 Slovenčina
 Slovenščina
 Norsk
 Svenska
 українська
 Ελληνικά
 Suomi
 Հայերեն
 עברית
 Dansk
 اردو


